TI TMS320 입문 연재 입니다.
1. CCS, C2000Ware, sprc191 (sprc097) 설치, compile
2. XDS100, XDS200 로 CCS Debug 하기
3. UniFlash 로 (CCS 없이) FW Download 하기(Driver 설치)
4. C2Prog 로 (CCS 없이) FW Download 하기
5. C2000Ware Sample code 를 다른곳으로 가져 가기
7. CCS, 다른 ( 옛날 ) Compiler (CGT) 버전 설치
8. TMS320 F28069 CCS SCI(UART) source == 본글
9. TMS320 F28069 CCS PWM source
10. TMS320 F28069 CCS ADC source
ㄱ. TMS320 error: program will not fit into available memory
==========================================
본글 목차 250321
1. 들머리
2. main.c ( Example_2806xSci_FFDLB_int.c ) 풀이
1) main 함수 부분
2) SCI (UART) 초기화 하는 데
3) 문자 보내는 데
4) 문자 받아 저장 하는 데
5) 받아 저장한 문자 처리 하는데
3. sprintf, printf
4. 소스
================================
1. 들머리
> Tx 는 일반(Normal) 방식, 즉 interrupt 안쓰고,
Rx 는 Interrupt 쓰는 방식으로 하였읍니다.
> 이런 방식을 인터넷에 뒤졌는데, 잘 안나오네요..
이거 저거 (C2000Ware 등) 에서 가위질 하고, 쬐끔 고쳤읍니다.
> rx 로 1바이트 받을때 마다 받은거 대소 문자 바꾸어 tx 하는 것입니다.
본래 제공 되는 예제는 2, 4 바이트 받는거로 되어 있는데, 불편 하여 1바이트 받는거로 바꾸었읍니다.
본 예제는 간단히 영문 대소문자만 잘 룹백 합니다... 숫자 등은 이상하게 됩니다.
뭐 개념 정리 용으로 그리 만든 것입니다.
2. main.c ( Example_2806xSci_FFDLB_int.c ) 풀이
1) main 함수 부분
//
// Main
//
void main(void)
{
    char *msg;

    //
    // Step 1. Initialize System Control:
    // PLL, WatchDog, enable Peripheral Clocks
    // This example function is found in the F2806x_SysCtrl.c file.
    //
    InitSysCtrl();

    //
    // Step 2. Initalize GPIO:
    // This example function is found in the F2806x_Gpio.c file and
    // illustrates how to set the GPIO to it's default state.
    //
    //InitGpio();    // 이 보기에서는 쓰는 GPIO 가 따로 없어, 안씀

    //
    // Setup only the GP I/O only for SCI-A and SCI-B functionality
    // This function is found in F2806x_Sci.c
    //
//    InitSciGpio();  // scia_fifo_init()  로 옮김,

    //
    // Step 3. Clear all interrupts and initialize PIE vector table:
    // Disable CPU interrupts
    //
    DINT;

    //
    // Initialize PIE control registers to their default state.
    // The default state is all PIE interrupts disabled and flags
    // are cleared.
    // This function is found in the F2806x_PieCtrl.c file.
    //
    InitPieCtrl();

    //
    // Disable CPU interrupts and clear all CPU interrupt flags
    //
    IER = 0x0000;
    IFR = 0x0000;

    //
    // Initialize the PIE vector table with pointers to the shell Interrupt
    // Service Routines (ISR).
    // This will populate the entire table, even if the interrupt
    // is not used in this example.  This is useful for debug purposes.
    // The shell ISR routines are found in F2806x_DefaultIsr.c.
    // This function is found in F2806x_PieVect.c.
    //
    InitPieVectTable();

    //
    // Interrupts that are used in this example are re-mapped to
    // ISR functions found within this file.
    //
    EALLOW;  // This is needed to write to EALLOW protected registers
    PieVectTable.SCIRXINTA = &sciaRxFifoIsr;        // PIE Group 9, INT1   SCI RX INT A
//    PieVectTable.SCITXINTA = &sciaTxFifoIsr;      // PIE Group 9, INT2   SCI TX INT A
    EDIS;   // This is needed to disable write to EALLOW protected registers

    //
    // Step 4. Initialize all the Device Peripherals
    // This function is found in F2806x_InitPeripherals.c
    //
    //InitPeripherals(); // Not required for this example
    scia_fifo_init();  // Init SCI-A 초기화

    //
    // Step 5. User specific code, enable interrupts
    // 초기 데이타 송신
    //
    msg = "\nHello SCI World!\n";
    scia_msg(msg);

    //
    // Enable interrupts required for this example
    //
    PieCtrlRegs.PIECTRL.bit.ENPIE = 1;   // Enable the PIE block
    PieCtrlRegs.PIEIER9.bit.INTx1=1;     // PIE Group 9, 인터럽트 1 (SCI-A RX) 활성화
//    PieCtrlRegs.PIEIER9.bit.INTx2=0;     // PIE Group 9, INT2   SCI TX INT A

    IER |= M_INT9;                      // Enable CPU INT, M_INT9 == 0x100(SCIA_RX)
    EINT;
    scia_msg("333");

    //
    // Step 6. IDLE loop. Just sit and loop forever (optional)
    //
    for(;;){
  //   scia_msg("444");
        parseByte();
    }
}
2) SCI (UART) 초기화 부분
//
// scia_fifo_init -
//
void
scia_fifo_init()
{
    Uint16 sci16baud;

     InitSciaGpio();     //   InitSciGpio();

    SciaRegs.SCICCR.all =0x0007;    // 1 stop bit,  No loopback, No parity,8 char bits, async mode, idle-line protocol

    SciaRegs.SCICTL1.all =0x0003;   // TX, RX 활성화, 내부 SCICLK, RX ERR, SLEEP, TXWAKE 비활성화
//    SciaRegs.SCICTL2.all =0x0003;
    SciaRegs.SCICTL2.bit.TXINTENA =0;   // TX 인터럽트 비활성화
    SciaRegs.SCICTL2.bit.RXBKINTENA =0; // RX 브레이크 인터럽트 비활성화 (필요 없음)
//    sci16baud = CalculateBaudRateAt90Mhz(9600); SciaRegs.SCIHBAUD = (sci16baud >> 8) & 0xFF ;    SciaRegs.SCILBAUD = sci16baud & 0xFF;
    SciaRegs.SCIHBAUD = 1;    SciaRegs.SCILBAUD = 0x24; // baud rate 설정 (LSPCLK 22.5MHz에서 9600 baud)
 //   SciaRegs.SCICCR.bit.LOOPBKENA =1;   // Enable loop back, 이거 하면 난리남...뭔데 이거 ?

    SciaRegs.SCIFFTX.all=0xE040;        // Tx FIFO 사용 설정

    // 수신 FIFO 1바이트로 설정 하고, 그거 차면 인터럽트 발생 하도록
    SciaRegs.SCIFFRX.all=0x2041;        // RX FIFO RESET enable, RX FF I EN A, Receive FIFO interrupt level bits==1 ( 1 byte 받으면 발생)
    SciaRegs.SCIFFRX.bit.RXFFIENA = 1; // RX FIFO 인터럽트 활성화, 이줄 없으면 인터럽트 안됨 !!!!!
    SciaRegs.SCIFFCT.all=0x00;

    SciaRegs.SCICTL1.all =0x0023;       // Relinquish SCI from Reset
    SciaRegs.SCIFFTX.bit.TXFIFOXRESET=1;
    SciaRegs.SCIFFRX.bit.RXFIFORESET=1;

    // 보류 중인 인터럽트 클리어
    SciaRegs.SCIFFTX.bit.TXFFINTCLR = 1;
    SciaRegs.SCIFFRX.bit.RXFFINTCLR = 1;
}
3) 문자 보내는 데
//
// scia_xmit - Transmit a character from the SCI
//
void
scia_xmit(int a)
{
    while (SciaRegs.SCIFFTX.bit.TXFFST != 0)   {    }
    SciaRegs.SCITXBUF=a;
}

//
// scia_msg -
//
void
scia_msg(char * msg)
{
    int i;
    i = 0;
    while(msg[i] != '\0')
    {
        scia_xmit(msg[i]);
        i++;
    }
}
4) 문자 받아 저장 하는 데
//
// sciaRxFifoIsr -
//
__interrupt void
sciaRxFifoIsr(void)
{
    rdBytes();
//    scia_msg("555");

    SciaRegs.SCIFFRX.bit.RXFFOVRCLR=1;   // Clear Overflow flag
    SciaRegs.SCIFFRX.bit.RXFFINTCLR=1;   // Clear Interrupt flag

    PieCtrlRegs.PIEACK.all |= 0x100;       // Issue PIE ack
}

void rdBytes()
{
    Uint16 ReceivedChar;

//    while(SciaRegs.SCIFFRX.bit.RXFFST == 1)
    {
        ReceivedChar = SciaRegs.SCIRXBUF.all;

        if(g_u32comRbytes < RXBUFSIZE)  {  					// Check if buffer full
            rRawDataA[g_u32comRhead] = ReceivedChar;
            g_u32comRhead = (g_u32comRhead == (RXBUFSIZE - 1)) ? 0 : (g_u32comRhead + 1);
            g_u32comRbytes++;
        }
    }
}
5) 받아 저장한 문자 처리 하는데
void Minus1Byte(){ g_u32comRtail = (g_u32comRtail == (RXBUFSIZE - 1)) ? 0 : (g_u32comRtail + 1); g_u32comRbytes--;}
void parseByte()
{
    Uint16 ReceivedChar;

    while(g_u32comRbytes) {
        ReceivedChar = rRawDataA[ g_u32comRtail ];
        ReceivedChar ^= 0x0020;   // 대소문자 반전 시키기
        scia_xmit( ReceivedChar );
        Minus1Byte();
    }
}
> 여기서 는 간단하게, 저장한 문자 꺼내고,
> 대소 문자 반전 하고,
> 다시 송신 하였는데,
> 이부분을 원하시는 데로 바꾸어 사용 하시면 됩니다.
3. sprintf, printf
1) TI 는 printf 에 대하여 많이 인색 합니다. 느끼기에 쓰지 말라는거 같군요.
어째든 printf 까지는 안되고, sprintf 만 조금 되도록 하였읍니다.
자세한것은 소스 참고 하시고,
#include <stdio.h>      // for use sprintf()

    char *pMsg;
    int n = 0;
    unsigned int m=33;

    pMsg = "\r\nHello World !\r\n\0";
    scia_msg(pMsg);
    // printf("Hello World %d\n", 2);  // printf 안됨

    sprintf( prBuf, "Ha00  \r\n");  scia_msg(prBuf);         // 문자

    sprintf( prBuf, "Ha11~ %d  \r\n", -5);  scia_msg(prBuf);  // 정수(+,-)
    sprintf( prBuf, "Ha11~ %u  \r\n", 10);  scia_msg(prBuf);  // 양수(+)

    sprintf( prBuf, "Ho22~ %Ld  \r\n", n);  scia_msg(prBuf);  // 큰정수
    sprintf( prBuf, "Ho33~ %Lu  \r\n", m);  scia_msg(prBuf);  // 큰양수

//    sprintf( prBuf, "Ho44~ %f  \r\n", 3.3);  //   float 안됨
//    scia_msg(prBuf);
2) 써 본거는 다음 입니다.
d: 숫자( + , - )
u: 양수 ( + )
Ld : 큰 수자
Lu : unsigned int
3) 해봐서 안된거는
- float
- printf
입니다.
> 250530 일자 부터, 소스에 들어 있읍니다.
4) sprintf 를 쓰기 위해서는 stdio.h 를 include 해야 합니다.
5) sprintf 에서 상수를 프린트 하기 위해서 즉 sprintf( buf, "aaa %d", 30 ); 과 같은거
compile 옵션에서 --printf_support=minimal 을 해 주면 되는데,
> Project > Properties ( ALt+Enter )
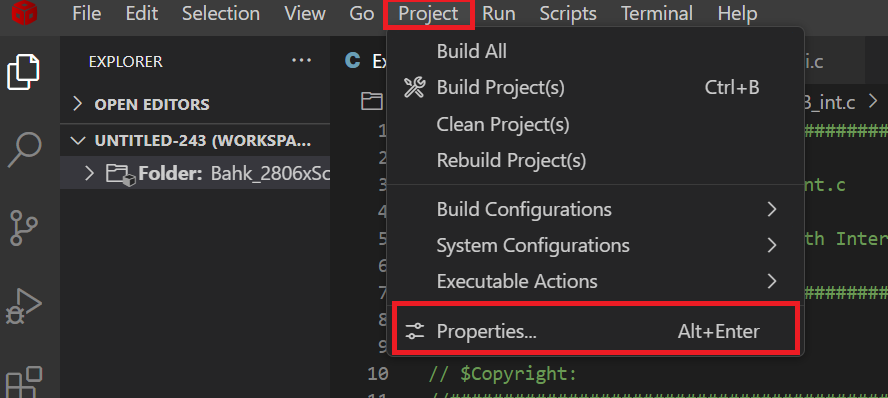
> Tools > C2000 Compiler > Advanced Options > Language Options
> Level of printf/scanf ~( --printf_support ) > minimal 또는 full

6) 변수를 쓰기 위해서는
compile 옵션에서 --printf_support=full 을 해줘야 합니다,
뭐 상수만 프린트 하는거는 거의 없을테니 "full" 을 해줘야 겠읍니다.
7) 위에서도 말씀 드렸드시 printf 를 쓰기 위해 메모리가 많이 먹으니
> 가능하면 쓰지 마시고,
> 쓰더라도 %d 만 쓰시고,
8) 뭐 다 아시겠지만, float 를 %d 로 하기 위해서는
float f = -1203.05
char a,b,c;
char prBuf[100];

    a = (int) ( f ) / 100 ;
    b = abs( (int) ( f ) ) % 100;
    c = abs( (int) ( (f - (int) f)  * 100 ) )  % 100 ;

    sprintf( prBuf, " f = %d%02d.%02d \n", a, b, c );
    scia_msg(prBuf);
와 같이 하는것도 하나의 방법이라 하겠읍니다.
함수로 만들어 보았읍니다.
// Fraction part of float 0.AABBCCDD  , 1:AA, 2:BB, 3:CC
// floatFrac(f,1) :소수 첫 두자리
char floatFrac(float f, unsigned char n){
    f = f - (int)f;		// 소수 부분 구하기
    switch(n){
        case 1: default: return abs( (int) (f * 100) ); break;		// AA 첫 2자리
        case 2: return abs ( (int) (f * 10000) % 100); break;		// BB 3,4 자리
        case 3: return abs ( (int) (f * 1000000) % 100); break;		// CC 5,6 자리
    }
}

// 부를때
    sprintf(prBuf, "%5d.%02d%02d", (int) f1, floatFrac(f1, 1), floatFrac(f1, 2));
    scia_msg(prBuf);

/////////////  본 내용은 아래 첨부 source 에는 들어 있지 않읍니다.
4. 소스
처음만들고 조금씩 고친거 계속 올리고 있읍니다, 맨 아래꺼가 가장 최신 입니다.
250530
'개발 > TI_TMS320' 카테고리의 다른 글
| TMS320 F28069 CCS ADC source : TI 입문 (0) | 2025.06.26 |
|---|---|
| TMS320 F28069 CCS PWM sample source : TI 입문 (0) | 2025.03.26 |
| TMS320 CCS v20 Project 만들기, 부르기, 빼기 : TI 입문 (0) | 2025.03.13 |
| TI C2000Ware Sample code 를 다른곳으로 가져 가기 : TMS320입문 (0) | 2025.03.13 |
| UniFlash 로 (CCS 없이) FW Download 하기(Driver 설치) : TI TMS320 입문 (0) | 2025.03.12 |

