본글은 Visual Source Code ( VsCode ) 로 Nuvoton 소스를 build ( compile ), debug 하는 글의 한 부분 입니다.
1. Nuvoton 제공 Sample Code를 Keil 에서 Compile 하기 ( https://bahk33.tistory.com/181 )
2. gcc 로 nuvoton source 직접 build(compile) 하기 ( https://bahk33.tistory.com/183 )
3. Visual Source VS Code 로 nuvoton Build(Compile) 하기 ( https://bahk33.tistory.com/185 ) : 본글
4. VS Code 로 nuvoton 디버그 하기 ( https://bahk33.tistory.com/186 )
==========================================
본문 목차.
1. VS Code 를 실행 하여 주셔요
2. tasks.json 파일 만들기
3. Extention 2개 ( cpptools , cmake-tools ) 설치 합니다.
- cmake, cpp 연결 하기위하여 설치 합니다.
4. cmake 실행 하여 make file 만들기
5. build (make, compile) 하기
6. flash(download) 하기
==========================================
1. VS Code 를 실행 하여 주셔요
> 먼저 설치가 안되어 있으면 설치 해 주시고 실행하여 주셔요
혹시 설치가 안되어 있으면
(portable) Visual Studio (VS) Code 설치 , Extension 설치, 삭제 를 참조 해 주세요
2. tasks.json 파일 만들기
> 먼저 이전글 gcc 로 nuvoton source 직접 build(compile) 하기 ( https://bahk33.tistory.com/183 ) 에서 작업할 소스를 가져 옵니다.
> tasks.json 는 cmd (명령 프롬프트) 창 등에서 실행 할 수 있는 여러 명령어들을 정의하는 파일이다.
여기서는 tasks.json 의 파일 포멧에 대하여는 자세한 설명은 하지 않읍니다. 자세히 알고 싶으시면,
https://go.microsoft.com/fwlink/?LinkId=733558 를 참고 하셔요

> 소스 디렉토리에서 ".vscode" 라는 디렉토리를 만들고, 그 안에 "tasks.json" 파일을 아래와 같이 만듭니다.
{
    // See https://go.microsoft.com/fwlink/?LinkId=733558
    // for the documentation about the tasks.json format
    "version": "2.0.0",
    "tasks": [
        {
            "label": "configure Mac",
            "type": "shell",
            "command": "cmake -S . -B build -G 'Unix Makefiles'"
        },
        {
            "label": "configure Win",
            "type": "shell",
            "command": "cmake -S . -B build -G 'MinGW Makefiles'"
        },
        {
            "label": "build",
            "type": "shell",
            "command": "cmake --build build -j16",
            "problemMatcher": [],
            "group": {
                "kind": "build",
                "isDefault": true
            }
        },
        {
            "label": "clean",
            "type": "shell",
            "command": "cmake --build build --target clean"
        },
        {
            "label": "flash(download)",
            "type": "shell",
            "command": "${workspaceFolder}\\tools\\flash.cmd  ${workspaceFolder}\\build\\UART_AutoFlow.bin"
        }
    ]
}
여기서 우리가 쓸것은 4가지 입니다
| 기능 | VSCode 명령 | 실제 실행 되는 명령어 | |
| 1) | make 파일 만들때 | configure Win | cmake -S . -B build -G 'MinGW Makefiles' |
| 2) | build 할때 | build | cmake --build build -j16 |
| 3) | 빌드 한거 지울때 | clean | cmake --build build --target clean |
| 4) | flash (download) | flash | flash.cmd UART_AutoFlow.bin |
> tasks.json 에 대하여 더 자세히 알고 싶으시면,
https://go.microsoft.com/fwlink/?LinkId=733558 를 참고 하셔요
3. Extension 2개 ( cpptools , cmake-tools ) 설치 합니다.
- cmake, cpp 연결 하기위하여 설치 합니다.
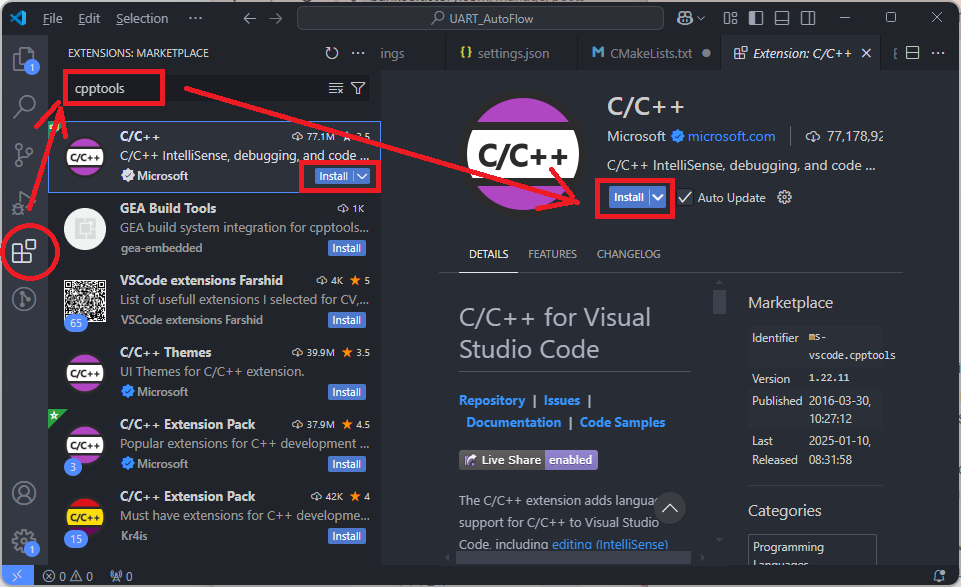
> cpptools
- Ctrl+Shift+X 를 누르면 Externtions Market Place 가 나오며 여기서 "cpptools" 를 타이핑 합니다.
- [insatll] 해 주셔요
- 혹시 따로 다운로드 하시려면,
https://marketplace.visualstudio.com/items?itemName=ms-vscode.cpptools
에서 받으셔요
> cmake-tools
- Ctrl+Shift+X 를 누르면 Externtions Market Place 가 나오며 여기서 " cmake-tools" 를 타이핑 합니다.
- [insatll] 해 주셔요

- 혹시 따로 다운로드 하시려면,
https://marketplace.visualstudio.com/items?itemName=ms-vscode.cmake-tools
에서 받으셔요
> 혹시 Extention 설치를 모르시면
(portable) Visual Studio (VS) Code 설치 , Extension 설치, 삭제 를 참조 해 주세요
4. cmake 실행 하여 make file 만들기
>. 디렉토리를 오픈 합니다. "UART_AutoFlow" 를 선택 하여 주셔요

> [F1] 을 누르시고 "run task" 를 타이핑 또는 선택 하시고,

> "configure Win" 을 선택 하시고

> "Continue without scanning the task output" 을 선택 하시면

> makefile 만드는 과정이 실행 되고
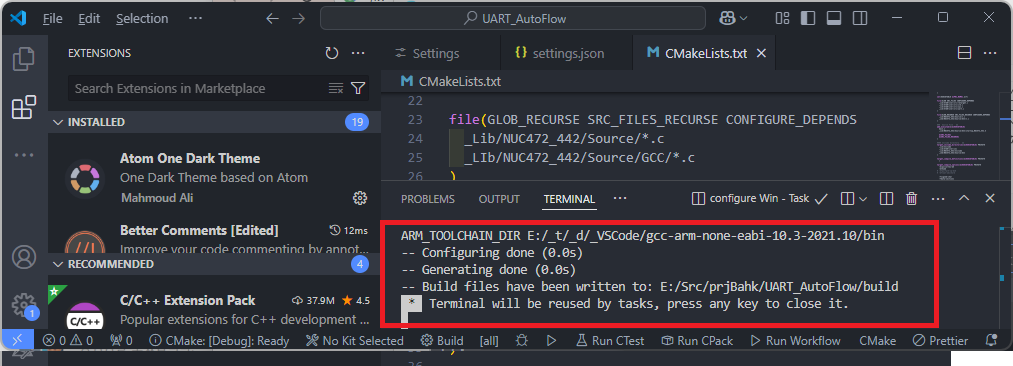
> 만들어진 makefile 을 build directory 에서 확인 할 수 있읍니다.

5. build (make, compile) 하기
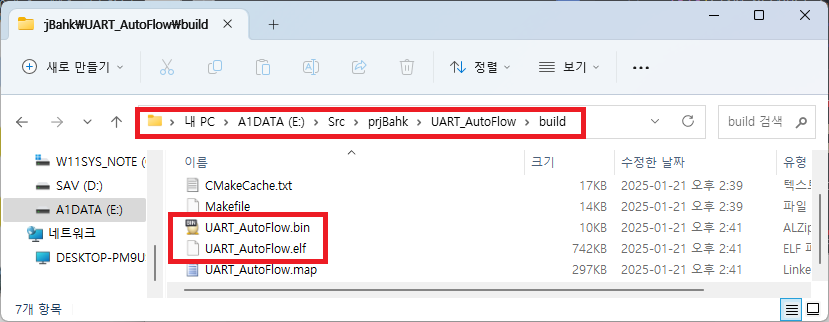
> [F1] > "run task" > "build" 를 하시면, binary 가 만들어 지고,
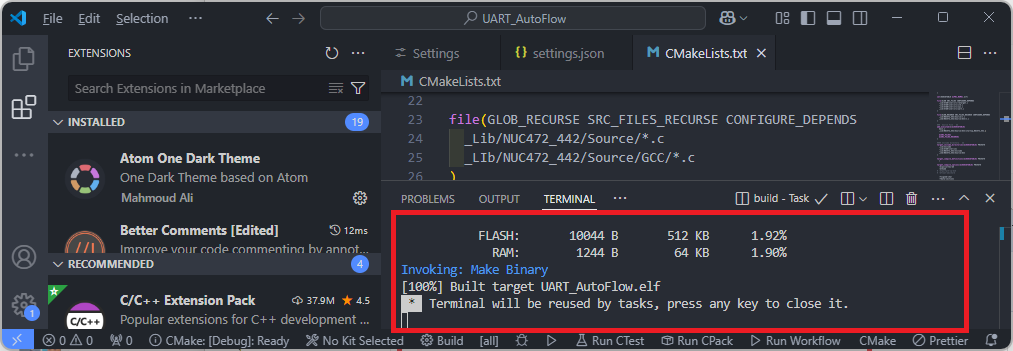
> 만들어진 바이너리는 build directory 에서 확인 할 수 있읍니다.
6. flash(download) 하기
하는 김에, vs code 에서 다운로드(flash) 까지 하는것 추가 합니다.
> 순서는
1) NU Link CMD Tool 설치
2) 파일 "tasks.json" 에 flash 부분 추가
3) 파일 "flash.cmd" 추가
입니다.
> NU Link CMD Tool
https://www.nuvoton.com/tool-and-software/software-tool/programmer-tool/ 에서 받으시든
이것 쓰시든,
설치 하셔요, 설치 하다 드라이버도 깔고 합니다. 모두 하셔요.
> 파일 "tasks.json" 수정한거 위에 있읍니다. 따로 첨부도 합니다
> 파일 "flash.cmd" 을 디렉토리 tools 에 저장 합니다.
Echo "Erase APROM area"
REM "%ProgramFiles(x86)%\Nuvoton Tools\NuLink Command Tool\NuLink.exe" -e APROM
"E:\_t\_d\_Nuvoton\NuLink_Command_Tool\NuLink.exe" -e APROM
Echo "Flash your program to APROM"
"E:\_t\_d\_Nuvoton\NuLink_Command_Tool\NuLink.exe" -w APROM %1
"E:\_t\_d\_Nuvoton\NuLink_Command_Tool\NuLink.exe" -reset
내용은 APROM 영역 지우고, APROM 영역에 쓰고, 리셋 하라는 거 입니다.
flash(download) 잘 되는것 확인 하였읍니다
첨부 합니다.
관련된 모든 파일은
https://1024terabox.com/s/14o6ublK_ChNyk_kNX44mLA
에서 받을 수 있읍니다.
다음글은
4. VS Code 로 nuvoton 디버그 하기 ( https://bahk33.tistory.com/186 )
입니다.
==========================
수고 하셨읍니다.
도움이 되셨으면, 댓글 부탁합니다. 댓글 하나에 힘이 됩니다.
고맙읍니다.
'개발 > Nuvoton' 카테고리의 다른 글
| Nuvoton m480 (m483) offline Download (0) | 2025.02.20 |
|---|---|
| VS Code 로 nuvoton 디버그 하기 (0) | 2025.01.21 |
| gcc 로 nuvoton source 직접 build(compile) 하기 (0) | 2025.01.20 |
| Nuvoton 제공 Sample Code를 Keil 에서 Compile 하기 (0) | 2025.01.10 |
| nuvoton, va_list 로 printf 만들기 , sample source (0) | 2024.06.05 |


